February 28, 2012

DIY: Glitter Shoes

I’m a firm believer that there is literally nothing than cannot be improved by the addition of glitter. Eye shadow, hair spray, pencils, nails, valentines, glue: all things bettered by the use of glitter. I think shoes are definitely on that list too, so when I started seeing a lot of glitter shoe tutorials around lately I recalled my foray into the DIY glitter shoe world in high school, which ended…badly. I needed to redeem myself!

Combining a few techniques I found online I made up a little tutorial so you too can improve your life by adding a pair of glitter shoes!

What You Need
A Pair of Shoes (I used ones that were worn and I was going to get rid of)
Mod Podge
Glitter (I ended up using one whole tube)
Paintbrush
Masking or Painter’s Tape
Disposable Cup or Container

How to Make It
1. Tape off all of the areas that you don’t want to cover in glitter. This includes the inside of the shoe too. It will take a while, but it’s really important because once you start you’ll see how messy this gets.
2. Mix the Mod Podge and glitter in your cup. I had a ratio of about 1.5 parts glitter to 1 part Mod Podge.
3. Start painting! Use your brush to evenly cover all the areas where you want to add glitter on each shoe. Let the coat dry fully (took me about 30-40 minutes).
4. Repeat…and repeat and repeat. Oh, and then repeat. Keep painting coats of the glitter glue mixture until you get a desired level of coverage, always letting it dry in between coats. This is a good craft to do during a movie marathon so the time (sort of) flies by. It’s also good to wash your brush in between coats so it doesn’t harden up. I ended up needing 7 coats.
5. When the last coat is dry, cover both shoes in a layer of just Mod Podge to seal everything in.
Let them dry (again!) and remove all of the tape to reveal a dazzling pair of glitter shoes! Oooh! Ahhh! What shiny feet you have! This final coat of glue should seal in the glitter so you can avoid leaving a trail of glitter behind you everywhere you go (unless, of course, you’re into that sort of thing).
xoxo,
Michelle

February 26, 2012

ROUNDUP: Weekly Links 2/26/12

Here's what I'm rounding up this week:
If you lived through the 90s this collection of photos, ranging from a Rock 'N Jock basketball game to a press photo signed "You're Too Cool" by Bob Saget to a candid of Ginger Spice typing away at a clunky desktop computer, will bring back warm and fuzzy memories or just make you glad we have 95% less daytime talk shows these days.

The lovely ladies over at Oh So Lovely Vintage are doing a weekly feature on the ABCs of Vintage, showcasing all kinds of fun retro goodies with a 60s vibe. You can read part one, two or three and check in next Sunday for part four.

Most people can't even play an instrument, let alone make one, let alone make one OUT OF ICE. This dude has a whole band setup and the ice percussion sounds amazing!

I'm a sucker for anything made with bamboo or natural wood, so these chic, eco-friendly sunglasses available on Etsy are right up my alley.

Have you ever noticed that some Wikipedia pages have the worst profile photos? A group photo for no reason, washed out with too much flash or an awkward underneath angle seem to be popular ways to make celebs look their worst. Whoever decides on the final photo must have some kind of vendetta, but Oh No They Didn't makes a positive spin on it, compiling a collection of the worst for our viewing pleasure.


xoxo,
Michelle

February 21, 2012

STYLE: OOTD

I've had the good fortune to be able to wear tights and skirts with minimal chill factor all winter - it was literally sunny and 45 degrees F this weekend! Maybe you're one of those lucky types who thinks that temperature sounds scary, foreign and chilling but for February in New England 45 degrees in basically a tropical paradise. I am taking FULL advantage of the relative warmth and rocking skirts and dresses with abandon!
Shirt: Target
Vest: Marshall's
Skirt: Target
Tights: Target
Knee Socks: Marshall's
Moccasins: Target
Earrings: DIY by me


Secret details - this vest has a lacy back! 

I love layering knee socks over tights!
These are SO comfy!

I made these red feather earrings by hand and they were really simple to do. 
I might do a tutorial on them if anyone wants to see one. Let me know!

I'm used to sweaters/layers/long sleeves being my go-to winter pieces but I'm getting a chance to incorporate all kinds of year round items this season - what are your go-to winter pieces? Are you having a warmer (or colder) winter than usual? It's almost spring!


xoxo,
Michelle

February 19, 2012

ROUNDUP: Weekly Links 2/19/12

Here's what I'm rounding up this week:
These adorable UK stamps feature favorites like Matilda, Fantastic Mr. Fox, The Twits and more! What a fantastic surprise to get in the mail!
There's no need to make up your mind with Tempaper, the repositionable temporary wallpaper. I love the way it was used here on the stairs - the options are endless!
Live out your wildest AD fantasies (or illusions) and tide yourself over until new episodes are available with these adorable and hilarious paper dolls.
Oh yes. Roseanne is headed back to sitcoms and she's bringing former TV hubby John Goodman with her. Granted, they won't be married this time around, but I can't wait to see them reunited and get a little taste of that Lanford flavor.
I hate motorcycles and hamburgers, but this hamburger Harley has somehow captured my heart. Check out this slideshow of other amazing food vehicles - spoiler: there's a banana mobile!


xoxo,
Michelle

February 17, 2012

OBSESSED: Sistema Containers

I know it might seem a little over the top to declare an obsession 
with a to-go lunch container, but hear me out, ok? 
Have you ever dreamed you could conveniently and securely transport your entire lunch in one container whilst keeping everything safe and separated? What’s that – you haven’t really ever thought about it? Oh, well maybe you’re more the type to dream about life ambitions or world peace, but I had a dream for the perfect segmented lunch container and it came true!

There are several models made by Sistema, but I’d like to express my love for one in particular: the Klip It Lunch Cube. This mighty lil’ guy, which I have in both a dazzling blue/green combo as well as a snappy purple/pink permutation, can hold an entire salad on top, plus a container of dressing, a pile of croutons and some tangerine slices without your lettuce getting all citrus-y and your croutons losing their crunch. To quote the great SchoolinPJs.com commercial, “but how is this possible?” I’ll show you:

The top is a separate section with snap closure which perfectly fits a sandwich, salad, slice of square pizza or general leftover type goodness. Oooh, ahhhh.

The bottom half has two sections, one slightly wider than the other, which are great for pretzels, crackers, fruit, baby carrots, chips – you name it. It’s a great place to stash a tiny container (of which I have many – got an 8 pack at Staples of all places for $1.00!) to hold peanut butter, dressing, dip, salsa, whatever.

I’ve been using these containers for about a year  and I  was battling a pretty strong addition last spring – I couldn’t go within a 2 mile radius of my Old Navy, where I bought them, without getting a fix…until I ran out of storage room. Now I have a happy collection and enjoy (because this is now how I derive pleasure, I guess) prepping lunches for the week ahead of time and having several bright containers looking back at me every time I open the fridge for a glass of water. I know this sounds crazy, but I have to assure you I'm not - I know on paragraph five of a rave about plastic containers sanity may not be taken for granted.

My love for Sistema containers stems from my admiration and fascination with Bento boxes (this site could mesmerize me for hours!) and while these are different, I do get that feeling of smart storage with a little fun. Plus my sandwich never gets pickle juice on it so this is basically the second coming, right?

You can find Sistema containers at The Container Store and on Amazon and my local Old Navy has been carrying them by the checkout at about $6.00 for the past year or so. Drool over more Sistema containers on their website.

xoxo,
Michelle

February 14, 2012

DIY: Bangle Holder

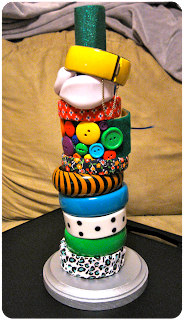
Remember those bangles made from a Pringles can that I featured a tutorial on recently? Well, it turns out making them is kind of addictive. Only one problem: bangles are kind of a pain to store. Solution: a handy DIY bangle holder!

What You Need
 
> A Solid Base (I’m using a circular piece of wood from the craft store – it was about $1.50)
> Aluminum Foil Roll or Paper Towel Roll (foil rolls are more narrow but thicker and sturdier – that’s what I’m using)
> Hot Glue
> Decorative Paper (I’m using GLITTER PAPER!)
> Scissors
> Paint, ribbon and/or embellishments (optional)

How to Make It
1. Trace the top of your roll on your decorative paper and cut out the circle, leaving a 1/4" border. Got glue this circle over one end of the roll and secure the border with more glue.

2. Measure your roll against your decorative paper and trim paper to fit both the height and circumference of the roll. Hot glue the paper onto the roll.

3. Paint or decorate your base piece if desired. I painted mine silver.

4. Glue your covered roll in the center of the base, holding it in place until dry and set. You can also add a line of hot glue around the perimeter of the roll where it meets the base and cover with ribbon, a string of craft pearls or whatever you like to conceal this seam.


That’s it! Stack your bangles on the roll for a great vertical storage solution to cluttered jewelry collections. Now you have an excuse to make more Pringles can bangles…

xoxo,
Michelle

February 12, 2012

ROUNDUP: Weekly Links 2/12/12

Here's what I'm rounding up this week:

This recipe from Hungry Happenings is adorable, delicious and a great V-Day gift idea!

Simple, colorful jewelry made from merino wool.  

Remember Crystal Pepsi, 3D Doritos, colored ketchup or Ecto Cooler? Well, you might as well forget them because all of them (and a bunch of others) are gone forever.

From modern Chinese spaces to centuries-old Portuguese shops, these bookstores are breathtaking - a must read for any bibliophile!

I love a good wiener dog and I want to wear this one around my neck!

xoxo,
Michelle

February 7, 2012

BEAUTY: Ikea Helmer Beauty Storage

I didn’t invent the idea of keeping beauty products in the Ikea Helmer storage unit, but I’m definitely behind it 100%. When I started seeing this small wonder on various beauty and nail polish blogs, I became almost instantly obsessed and plotted a trip to Ikea.
 
There’s a reason these are so prevalent in the beauty blogging world – they really work. Small but mighty, the unit is only 11” wide,  27” tall and 16.75” deep, but its six drawers provide the perfect storage for all your girl bits (no, not those ones). Another reason they’re so popular is that the drawers are deep enough to store nail polish bottles upright, which is best. I’ve had mine in a mangled horizontal mess for pretty much eternity so I’m psyched to have them all neatly standing up where I can clearly see everything.

The Helmer is fairly easy to assemble as far as Ikea furniture goes and didn’t require any special tools. It also comes with wheels to keep it mobile. At $40.00 (US) it’s a little more than I wanted to spend (especially at Ikea), but if given the chance I would DEFINITELY do it again! Enough blabbin' - on to the pictures!

 
My top drawer is most of my makeup, which I’ve organized into sections with all my quick grab kind of things (chapstick, liquid eyeliner, tweezers) right up front.
The second drawer is more makeup, mostly palettes and more lip products.

The third drawer is my hair items, separated by type in these small dollar store organizers (3 for $1.00!). My brush fits right along the side and headbands are in back.
The fourth drawer is all my nail products.
 
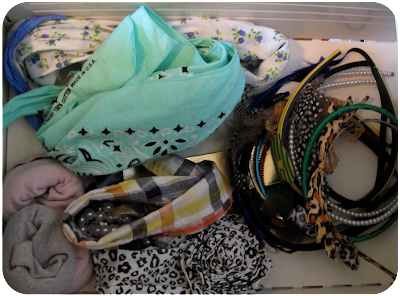
The fifth drawer is various scarves, bandanas and more headbands.
The bottom drawer is body sprays and fragrances which I honestly barely use. Looking at this I just realized one of these perfumes was a Christmas gift – in 2001!

This is a great storage unit for small spaces like apartments, and combined with a TV tray table I was able to make a tiny vanity area in my somewhat cramped bedroom. A veritable oasis if I ignore the mountain of dirty laundry behind me!
A major bonus is that the Helmer would work anywhere in your home. If I ever get a new makeup storage solution (in my fantasy world where I don’t live in an apartment) I can easily make this storage for files, utensils or towels in other rooms. I got my Helmer in white for this versatility (it also comes in gray and red).

Do you use a Helmer too? If not, how do you store your makeup? Show us pictures!

xoxo,
Michelle
Related Posts Plugin for WordPress, Blogger...