Showing posts with label Glitter Nail Polish. Show all posts

April 21, 2013

BEAUTY: Ombre Glitter Nails


I have a small collection stable of nail polish, but I'm pretty picky when it comes to my glitter polishes. I don't buy too many, and I try to get versatile or special shades when I do. I picked up a few China Glaze polishes at Sally's recently (BOGO FREE!) and finally indulged in their Fairy Dust glitter, which I'd seen swatched on nail blogs several times and had been on my ongoing mental shopping list. I wanted to try it right away, and was inspired by the great galaxy manicures I've seen around, so I created this ombre purple look with a glitter overlay, which reminds me of deep space skies. Here's how you can get the look:

WHAT I USED
Wet n Wild On a Trip  //  China Glaze VIII  //  China Glaze Fairy Dust  
Seche Vite Top Coat  //  Cosmetic Wedge  //  Tweezers  //  Scissors

HOW TO DO IT
Paint a base coat of the light purple polish (1-2 coats) and let it dry.
Cut up the cosmetic wedge into smaller pieces.
Holding a piece in the tweezers, paint the wedge with the darker purple polish.
Lightly stamp your nail with the wedge to deposit color, going about halfway up the nail.
Add more color at the tips (this area should be the darkest) and repeat on all nails.
When fully dry, paint 2 layers of the glitter polish and top with Seche Vite when finished.
This glitter is some of the best I've ever had! It's hard to capture on camera, but it is super packed with fine holographic sparkles, which create an amazing all over shimmer on your nails. This would go well over any polish and also looks nice on its own when you use 2-3 layers. I love this stuff!


xoxo,
Michelle

July 14, 2012

DIY: Nail Polish Jewelry

I'm always looking for fun new kinds of jewelry to experiment with and when I found this cool new technique I just had to share! I bought a bunch of jewelry making supplies online - mostly materials I'd never worked with that I couldn't find at my local craft stores. Among them were these clear glass flat-back beads with a magnifying effect. 
They remind me of those glass beads that everybody thought looked
SO classy in a vase with fake flowers in the 90s.
You can see the magnifying effect here.
Because of the magnified appearance, putting images or decoration behind/under the bead creates a cool look. I tried mine with some nail polish for a fun gemstone-esque look. Here's how you can do the same:


What You Need
Magnifying Bead & Bezel Pendant Kit 
(I bought mine online here, but I'm sure you can get them tons of other places)
Glitter Nail Polish
Color Nail Polish
Strong Glue (I used E-6000)

How To Do It
1. Paint your bead with your glitter polish until you reach your desired glittery-ness. Mine took 3 coats. Make sure to let it dry completely between each coat. I used Queen of Beauty from Sinful Colors.
2. Paint your second color over the glitter coat until it's opaque. Mine took 2 coats. I used Hazard from Sinful Colors.


3. When completely dry, apply a thin layer of glue over the entire back of the bead and press it into the necklace base (bezel) and press for 30 seconds. Let it dry upside down to avoid air bubbles.


I've also made some earrings with smaller beads and rings with larger ones. I'm thinking of making a million of these to wear and to add to my Etsy shop because they are so fun! Here are a few that I made without glitter, just capturing some especially shimmery and holographic polishes. 
Canadian Star from Nicole
Teal of Fortune from Wet n Wild
Fuchsia Rage from Nina Ultra Pro & Pacific Blue from Sally Hansen with Make U Smile from Nicole on top
They look even more sparkly in person and when they catch the light they're incredible - it's distracting having it on my hand! You could try this with paint too or other thin materials like confetti, printed images or pieces of maps or book pages. The magnifying effect makes whatever you add really shine!


xoxo,
Michelle

November 27, 2011

ROUNDUP: Weekly Links 11/27/11

Here's what I'm rounding up this week:


Kotik Precious Metals
This beautiful and eco-friendly jewelry is made from a colorful array of bottle caps which have been bent, twisted and flattened into too cool rings, necklaces, pins, flowers and more.
The Slutcracker
This burlesque retelling of The Nutcracker tells the tale scene for scene with a decidedly racy twist. Described as "sexy freaky" this show is a holiday must for those in the Boston area.
Easy Removal for Glitter Nail Polish
As much as I love glitter nail polish, taking it off is nothing short of a nightmare. Thanks to Pink Sith for sharing this ingenious method which requires no deep scrubbing efforts - just some polish remover, cotton pads and foil. Plus, you get to make your fingers look like tiny baked potatoes!
Amazing Treehouses
These amazing treehouses prove that living indoors is totally overrated.
Helvetica Monopoly
Keep it simple and sleek with this Helvetica Monoploy - a dream for any designer.


xoxo,
Michelle

August 21, 2011

DIY: Glitter Nail Polish


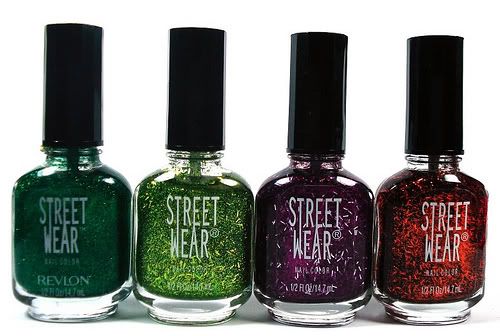
I recently realized that I haven’t owned any glitter nail polish in waaaaaay too long, which is basically an outright betrayal to my eighth grade self. I think the last one I had was made by Revlon Street Wear (does anyone else remember this late 90s relic?!), if that gives you any idea of how long its been. Determined not to leave sparkly digits to just the junior high set, I scoured stores for the best, densest, almost blinding glitter polish I could lay my hands on. I settled with Sally Hansen’s Pink-y Ring. This sparkly shade of pink packed a powerful punch, but ended up chipping  off almost immediately because I had to layer it on super thick to achieve a full coverage sparkle. Since I haven’t been able to find a polish that's packed densely enough, and because I NEED this level of sparkle in my life, I decided to try my hand at DIY glitter nail polish. It was easier and more successful than I’d anticipated, and I created an easy-to-follow tutorial (if you can even call it that - we’re talking 3 steps here!) for you to try for yourself:


Supplies:
+ Glitter (I used fine glitter, but it depends on how chunky you want the look)
+ Clear nail polish (I used Wet n’ Wild FastDry top coat)
+ Small funnel or piece of small paper fashioned into a cone shape

DIY: Glitter Nail Polish Tutorial


Step One: Using a very small funnel or paper cone (Post-Its are a good size), pour about one teaspoon of glitter into the clear polish bottle.


Step Two: Place the polish cap back on and gently shake the bottle to distribute glitter. You can also roll the bottle between your hands (like you would to make a clay snake) to work it through. Add more glitter about one teaspoon at a time until you’ve reached the desired level of sparkle.

Step Three: Apply 1-2 coats to nails, letting polish dry thoroughly between coats, and seal with a top coat. [Note: you can also put a layer of regular polish in a shade that matches your glitter underneath first for a fuller look]

Step Four: Blind others with your outrageous level of sparkle (optional).

Alternative method: For the purple nails I wanted to try something a little different to see which tactic I liked better. First, I put down a coat of purple polish. Next I added a clear top coat and slowly poured purple glitter on top. After shaking off the excess onto a piece of paper (you can easily add it back to your tube that way) I added another layer of clear top coat to seal in the glitter. 


For all nails you'll need to clean up the excess glitter on your fingers (and probably everywhere else in your workspace!). Both methods created a great end result, but I'd say the second method was a little easier but also much messier. Close up of glitter:


I got a six pack of fine glitter from JoAnn Fabrics for about $4.00 and clear polish for $1.00 each so this is totally affordable and totally addicting. Let me know how it goes if you try it out!
Who else is bringing back glitter nails?



Related Posts Plugin for WordPress, Blogger...